How to Install Nextcloud on Docker in 2024

Nextcloud is a powerful open-source software that allows you to store, access, and share your files, calendars, contacts, and more, all in one secure place. Docker, on the other hand, is a popular platform that simplifies the process of deploying applications in containers, providing an efficient and isolated environment for running software.
Combining the flexibility of Nextcloud with the ease of use and portability of Docker, such as in the case of “Nextcloud Docker,” can greatly simplify the installation and management of Nextcloud. In this article, we will guide you through the process of installing Nextcloud on Docker, enabling you to take advantage of the benefits of both technologies.
What is Nextcloud?

Nextcloud emerges as a robust open-source platform for hosting and sharing files, enabling seamless storage, access, and collaboration across diverse devices. This versatile tool empowers users to establish a personalized cloud storage solution, granting complete autonomy over their data.
Functioning as a file-sharing and collaboration hub, Nextcloud facilitates effortless storage, synchronization, and sharing of files, photos, and documents among devices. It operates as an integrated self-hosted platform, merging cloud storage, collaboration features, and office tools.
In essence, Nextcloud serves as a private cloud alternative to mainstream storage platforms, presenting itself as a self-hosted counterpart to services like Dropbox while incorporating Office suite functionalities.
While officially supporting multiple Linux servers, such as Ubuntu, Debian, and CentOS, Nextcloud can also be configured to run on Windows.
The platform is adaptable to various server environments, including cloud servers, on-premise setups, virtual private servers, bare metal cloud, or through the utilization of fully managed Nextcloud hosting services.
How to Install Nextcloud on Docker?
To install Nextcloud on Docker, you must follow the four sections mentioned below:
1. Establishing the Project Environment
Initiate the process by configuring your server environment in this initial section, ensuring its readiness for running Nextcloud on Docker. The following ten steps will guide you through the setup, ensuring that everything is configured appropriately.
Step 1: Establish a secure connection to your server using Secure Shell
To commence, create a secure connection to your server through SSH (Secure Shell). Open your local terminal or command prompt and input the following command, substituting “user” with your username and “your_server_IP” with the actual IP address of your server:
- ssh user@your_server_IP
Step 2:Confirming Docker and Docker Compose Installation
Prior to advancing, it is crucial to have Docker and Docker Compose installed on your server. You can validate their installation by executing the subsequent commands in your terminal:
- systemctl is-active docker
- docker-compose –version
Step 3: Updating System Packages
Maintaining best practices involves keeping all packages on your server up to date. Execute the following command to update system packages:
- apt update && apt upgrade
Step 4: Updating Server Hostname
Proceed to modify the server hostname to align with your Nextcloud domain. This step is crucial for enhanced server management and accessibility, particularly if you have a domain linked to your server.
If you intend to use the server’s IP for access, feel free to skip this step. Open the hostname file in the Nano editor by executing the following command:
- sudo nano /etc/hostname
Then, input your domain and save the file.
Step 5: Generate a local user with sudo and Docker access
In this step, generate a new user and provide them with sudo privileges. Establishing a separate user with sudo access allows you to execute administrative tasks while mitigating potential risks linked to root access. Furthermore, you will incorporate Docker access to streamline Docker management.
Execute the subsequent commands, substituting “demo-user” with your chosen username:
- adduser demo-user
- usermod -aG sudo demo-user
- usermod -aG docker demo-user
Having configured the hostname, updated packages, and established a new user, proceed to reboot the server to implement these modifications.
Step 6: Activate the firewall and restart the server
In the following step, activate the firewall and define the ports to be opened, securing and facilitating access to your server.
- sudo ufw enable
- sudo ufw allow 22/tcp # Open SSH port for secure remote access
- sudo ufw allow 80/tcp # Open HTTP port for web traffic
- sudo ufw allow 443/tcp # Open HTTPS port for secure web traffic
Now, execute the reboot command to implement the modifications made thus far:
- sudo reboot
Step 7: Access the server via SSH using the local user
Reconnect to the server by logging in with the new local user you established earlier.
- ssh demo-user@your_server_IP
Step 8: Establish a project directory
Maintain organization by setting up a dedicated directory for your Nextcloud project. This directory will act as the focal point for all project files. Utilize the following commands to create the directory and navigate into it:
- mkdir nextcloud
- cd nextcloud
Step 9: Create a .env file
For secure storage of sensitive information such as passwords and secret keys, generate a .env file. This file will hold your database details for use in the docker-compose configuration. Use the following command to create and open the .env file, specifying its name:
- sudo nano db.env
Insert the following content into the file, replacing the values for MYSQL_ROOT_PASSWORD, MYSQL_PASSWORD, and MYSQL_USER. Ensure you use strong and unique passwords for both the MySQL root user and the Nextcloud database user to enhance the security of your Nextcloud installation. Save the file after making the changes.
- MYSQL_ROOT_PASSWORD=yoursqlrootpassword
- MYSQL_PASSWORD=yourmysqlpassword
- MYSQL_DATABASE=db
- MYSQL_USER=yourmysqluser
Explanation:
- MYSQL_ROOT_PASSWORD sets the password for the root user, granting full administrative access to the database.
- MYSQL_PASSWORD specifies the password for the Nextcloud database user, used by the Nextcloud application to interact with the database.
- MYSQL_DATABASE indicates the database name created for Nextcloud.
- MYSQL_USER establishes the username for Nextcloud to access the database.
These environment variables are crucial for your Nextcloud setup, providing the necessary credentials and settings for Nextcloud to establish a secure connection to the database, allowing efficient data storage and retrieval.
Step 10: Create a docker-compose.yml file
Now, open the docker-compose.yml file in the nano editor using the following command:
- sudo nano docker-compose.yml
Insert the following content into the file and save:
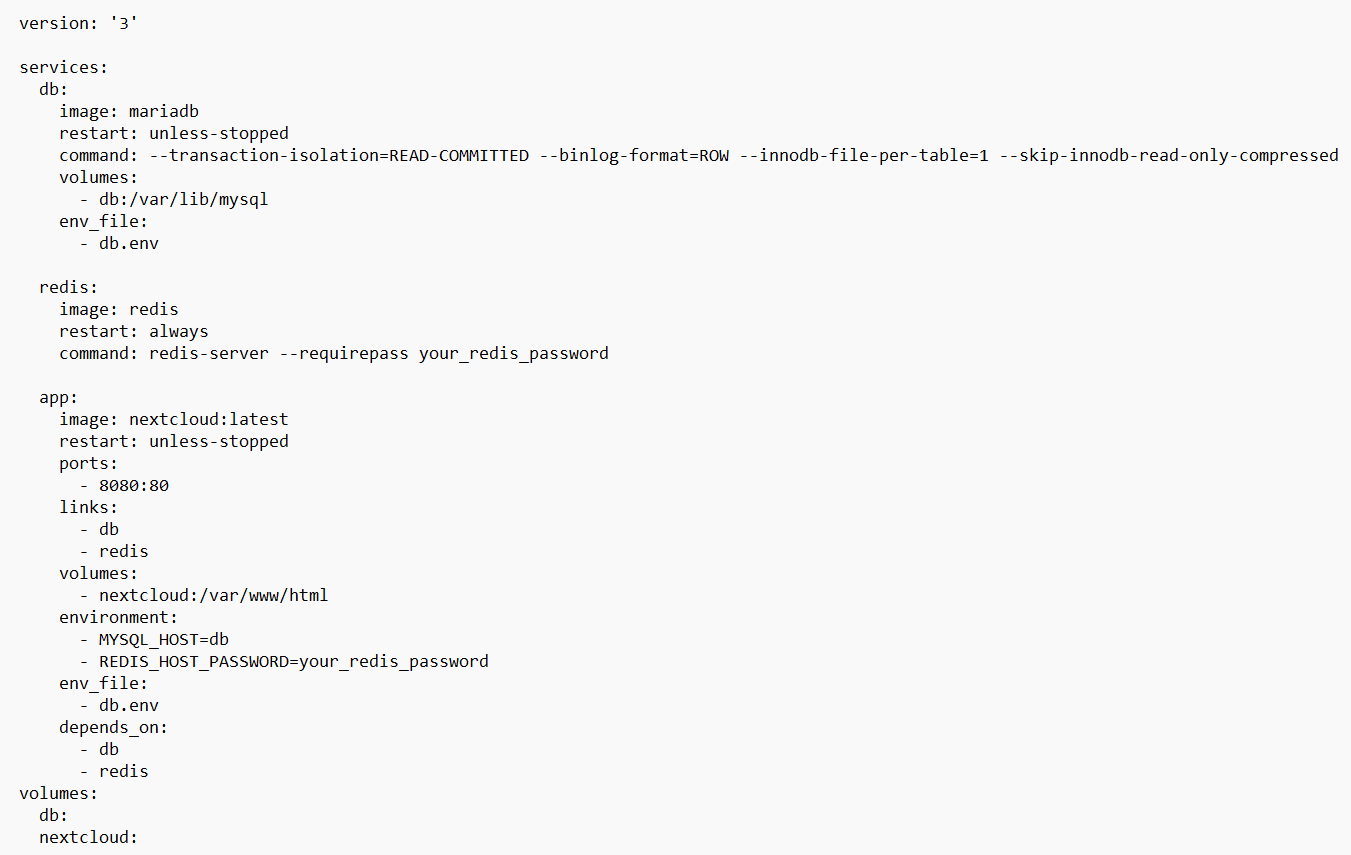
Explanation:
- version: ‘3’: Specifies the version of the Docker Compose file format being used.
- services:: Defines individual containers or services for the application.
- db:: Uses the MariaDB image as the database for Nextcloud. It restarts unless explicitly stopped and stores data in the “db” volume. The
- “env_file” directive imports sensitive environment variables from “db.env” to set up the database.
- redis:: Utilizes the Redis image as a caching server.
- app:: Runs the Nextcloud service, exposing port 8080 on the host. It links to the “db” and “redis” containers, stores data in the
- “nextcloud” volume, and uses environment variables for configuration. It depends on the “db” and “redis” services.
- volumes:: Defines named volumes (“db” and “nextcloud”) for persistent storage of data in the MariaDB database and Nextcloud application.
2. Install Nextcloud using Docker
With your project environment configured, you are now prepared for the installation process. This section will walk you through the two steps required to install Nextcloud on Docker, providing you with a secure and effective self-hosted Nextcloud instance.
Step 1: Execute docker-compose up
Navigate to the project directory containing the docker-compose.yml file and initiate the deployment of your Nextcloud instance with the following command:
- docker-compose up -d
This command will launch the containers and run them in detached mode, allowing them to operate in the background.
Step 2: Verify the status of running containers
To confirm that the containers are operational as intended, execute the following command:
- docker ps
Examine the volumes by executing the following commands:
- docker volume inspect nextcloud_db
- docker volume inspect nextcloud_nextcloud
The docker volume inspect command furnishes comprehensive details about a volume, including its mount point on the host and any specific settings attributed to it.
With the Nextcloud container operational, access the installation page in your web browser by entering http://your_server_IP:8080. Alternatively, if an SSL certificate is in place for your associated domain, use https://your_domain for secure HTTPS access.
3. Enable HTTPS for Nextcloud
This section will lead you through the process of setting up HTTPS for your Nextcloud using an Nginx proxy server and acquiring a free SSL certificate from Let’s Encrypt in five steps. If you do not have a domain, you can opt for a self-signed certificate generated using OpenSSL.
Step 1:Install Nginx
Commence the installation of Nginx on your server with the following command:
- sudo apt-get install nginx
After the installation, verify the successful installation of Nginx by executing:
- sudo nginx -v
Step 2: Install Certbot
Proceed to install Certbot, the Let’s Encrypt client utilized for generating Let’s Encrypt certificates. Follow the steps below to install Certbot using Snapd:
Install snapd by executing:
- sudo apt install snapd
Ensure that you have the latest version of snapd:
- sudo snap install core; sudo snap refresh core
Install Certbot using Snapd. If Certbot was previously installed using a different package manager, uninstall it before proceeding:
- sudo snap install –classic certbot
Simplify the execution of Certbot commands by creating a symbolic link for the Certbot executable:
- sudo ln -s /snap/bin/certbot /usr/bin/certbot
Step 3: Craft a configuration file for your domain
Now that Certbot is installed, you can proceed to generate Let’s Encrypt SSL certificates. However, before doing so, create an Nginx configuration file for your domain:
- sudo nano /etc/nginx/conf.d/nextcloud.conf
Insert the following configuration into the file and save it:
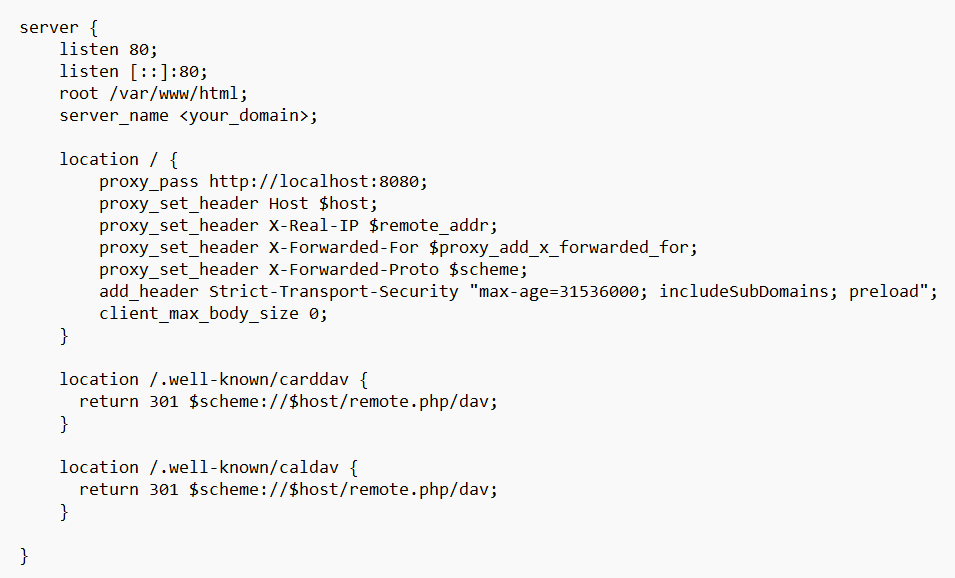
Step 4: Confirm the syntax of the configuration and initiate the restart of Nginx
Execute the subsequent command to guarantee the accuracy of the configuration and restart Nginx:
- sudo nginx -t && sudo nginx -s reload
Step 5: Create an SSL certificate with Let’s Encrypt
Generate an SSL certificate for your domain using Certbot. Substituting <domain> with your domain name and <email_address> with your email for certificate notifications, use the following command:
- sudo certbot –nginx -d <domain> -m <email_address> –agree-tos
Certbot will autonomously apply the essential adjustments to your NGINX configuration, activating SSL/TLS for your domain. It identifies the server block in your NGINX configuration that includes the server_name directive corresponding to the domain for which you’re obtaining a certificate.
To validate the modification of the configuration file, access the file using the nano editor with the following command:
- sudo nano /etc/nginx/conf.d/nextcloud.conf
4. Begin the initial setup of Nextcloud using Docker
Now that your server is set up to allow secure access through HTTPS, you can securely access Nextcloud via a web browser. Proceed with the installation process and configure Nextcloud accordingly.
Step 1: Access Nextcloud via a web browser
Navigate to the domain (https://<your_Nextcloud_domain>) in your browser, where you should encounter the start page. Provide a new admin username and password in the designated fields, and then click on the “Install” button.
Step 2: Install the suggested applications
On the following page, you’ll receive a prompt to install recommended apps. These applications offer extra functionality and features to enrich your Nextcloud experience. You can proceed with the installation or choose to skip this step.
If you opt to install the apps, you will observe a notification indicating that the apps are currently being installed. Once the installation is complete, you will be redirected automatically to the default user dashboard.
Securing your Nextcloud installation on Docker
Secure your Nextcloud with HTTPS
It’s vital to prioritize the privacy and security of your Nextcloud data. Enabling HTTPS with SSL/TLS encrypts the communication between users’ browsers and the Nextcloud server, thwarting unauthorized access and data interception.
To achieve this, acquire an SSL/TLS certificate. Services such as Let’s Encrypt provide free certificates, ensuring a secure Nextcloud installation without incurring additional costs.
Establishing User Authentication
User authentication is the initial defense against unauthorized access to your Nextcloud setup. Implement robust username and password policies to encourage users to create secure and distinctive credentials.
Additionally, consider incorporating extra authentication methods, like two-factor authentication (2FA). This enhances security by demanding users to provide a second form of verification, such as a unique code, along with their password.
Setting Up Firewall Rules
Firewalls serve as a protective barrier between your Nextcloud server and external networks, managing both incoming and outgoing traffic. It’s crucial to configure firewall rules to regulate access to your Nextcloud installation and safeguard it from malicious activities.
Make certain that only essential ports are open, and close or restrict all unnecessary services and access points. Periodically review and update your firewall rules to proactively address potential security threats.
Conclusion
In summary, using Docker to install Nextcloud, commonly known as Nextcloud Docker, offers a convenient way to manage and access your files. The step-by-step instructions in this article make it easy to set up and customize Nextcloud on Docker. Leveraging Nextcloud’s capabilities and Docker’s flexibility, you can create a secure and scalable cloud solution, boosting productivity and collaboration. Begin exploring Nextcloud on Docker to take control of your data today.


