
In today’s interconnected world, the use of reverse proxy servers has become increasingly important for secure and efficient web application delivery. Synology NAS, renowned for its versatile features, provides an excellent platform for implementing reverse proxy functionality.
This article serves as a comprehensive guide, offering step-by-step instructions and insights on how to effectively utilize reverse proxy on Synology NAS. From the basics of reverse proxy to advanced configurations and troubleshooting, this article will equip you with the necessary knowledge to harness the power of reverse proxy on your Synology NAS device.
What is Reverse Proxy?
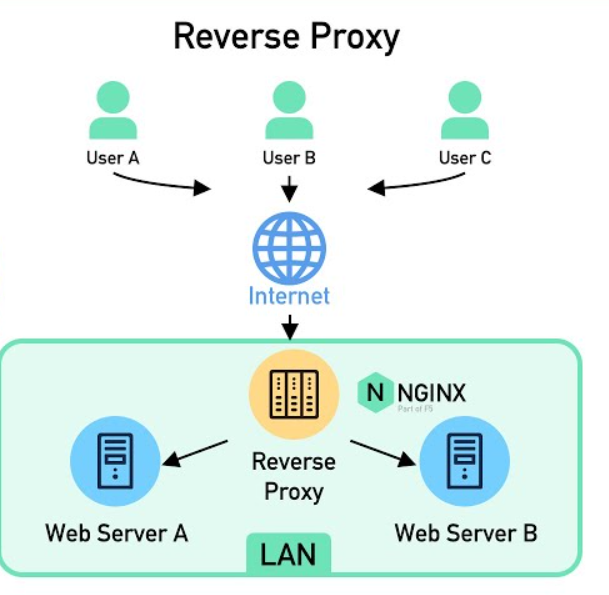
Picture this: you’re at a coffee shop with your laptop, wanting to visit a website blocked by your office firewall. You’re annoyed since you need to work. Meet the reverse proxy, your solution. It’s like a middleman between you and the blocked website, passing your requests and bringing back the responses, bypassing the office firewall.
Now, let’s discuss the reasons to utilize a reverse proxy on your Synology NAS. First and foremost, it enhances security by concealing your NAS’s actual IP address, providing an additional layer of defense against potential attacks.
Additionally, it enables access to multiple web applications on your NAS using a single domain name and port number, simplifying access for both you and your users.
Lastly, it facilitates the straightforward management and configuration of SSL/TLS certificates for secure connections. In summary, integrating a reverse proxy into your Synology NAS can streamline your life and bolster your online security.
Overview of Synology NAS
Now, let’s discuss the reasons to utilize a reverse proxy on your Synology NAS. First and foremost, it enhances security by concealing your NAS’s actual IP address, providing an additional layer of defense against potential attacks.
Additionally, it enables access to multiple web applications on your NAS using a single domain name and port number, simplifying access for both you and your users.
Lastly, it facilitates the straightforward management and configuration of SSL/TLS certificates for secure connections. In summary, integrating a reverse proxy into your Synology NAS can streamline your life and bolster your online security.
How to Use Reverse Proxy on Synology NAS?
Below, we will explore how to employ a reverse proxy on a Synology NAS. However, please note that you’ll need to repeat this process for each web server you wish to expose.
For your Synology NAS to serve as a Reverse Proxy server, it’s crucial to port forward TCP Ports 80 and 443 to the NAS. The specific steps for port forwarding vary with each router, but it’s essential for utilizing the Reverse Proxy feature.
Before proceeding, it’s important to clarify that setting up a reverse proxy on a NAS makes that service accessible outside your local network.
To use a reverse proxy effectively, you need a domain name directing to your local network. This could be a DDNS hostname or, if you own a domain, an A/CNAME record.
Once you’ve established the DDNS hostname or A/CNAME record, you can proceed with the Synology Reverse Proxy setup in DSM.
- To reach the Reverse Proxy section in DSM 7, navigate to the Control Panel, choose Login Portal, and then proceed to Advanced.
- Once in the Advanced section, click on Reverse Proxy.
- Click on “Create” to generate a new item.
- You need to create one item for each web server you wish to expose.
- The settings below will require modification, and we’ll examine each option.
Reverse Proxy Configuration
Reverse Proxy Name: A label for your reference.
Source
The source is what you’ll employ when accessing this web server from outside your local network, including the domain name, protocol, and port for external access.
- Protocol: HTTPS – ensuring the use of HTTPS, to be paired with a certificate later.
- Hostname: The domain name or DDNS hostname in use.
- Port: 443 (for HTTPS)
Ensure that Enable HSTS is selected, and for now, disregard the Access Control Profile—we’ll delve into this later.
Destination
- Protocol: HTTP or HTTPS – determined by the web service being exposed. For instance, using Synology DSM, you can use HTTP with port 5000 or HTTPS with port 5001 (default ports). The crucial aspect is matching the correct protocol with the specified web service.
- Hostname: The hostname or IP address of the local server. For DSM, this might be localhost or the IP address of your Synology NAS. Typically, enter a static local IP address here.
- Port: The port used by the local web server. As mentioned earlier and using Synology DSM’s default ports as an example, if you choose HTTP, use port 5000, and for HTTPS, use port 5001.
The default settings can be used, but advanced settings and custom headers may be necessary in specific cases.
Access Control Profiles for Reverse Proxy on a Synology NAS
Following the setup of a reverse proxy, you might consider restricting access to a designated IP address or subnet. This precaution guarantees that only the specified IP addresses will have access to the reverse proxy associated with this particular profile.
It’s essential to note that this step is optional, and you may choose to skip this section based on your specific requirements.
- Choose Access Control Profile and click on Create.
- Add the desired IP addresses at the top, and include a deny-all rule at the bottom to block all other IP addresses.
- When modifying existing reverse proxy rules, assign this access control profile to ensure that only the specified IP addresses are granted access.
Now that the reverse proxy is established, the next step is to generate and apply an SSL certificate using Let’s Encrypt.
- Go to the Control Panel, then navigate to Security and select Certificate. Click on Add.
- Choose to add a new certificate and click Next.
- Opt for “Get a certificate from Let’s Encrypt” and click Next.
- Enter the domain name, using the hostname from the Source section in the Synology reverse proxy setup. Input your email and click
- Apply to create the certificate.
- Once the certificate is created, go to Settings.
- Verify that the Reverse Proxy Hostname is listed, then select the newly created certificate.
The certificate is now generated, assigned to the reverse proxy, and set to auto-renew. You should now have access to the server with a valid SSL certificate.
Troubleshooting Common Issues with Reverse Proxy on Synology NAS
Even with good preparation, issues can arise, especially with Reverse Proxy on Synology NAS. Don’t worry; we have troubleshooting tips for you.
Dealing with Connection Errors
Encountering connection errors can be frustrating, but there are simple steps to resolve them. Investigate firewall settings, confirm proper port forwarding configurations, and double-check DNS settings.
Troubleshooting SSL/TLS Certificate Problems
SSL/TLS certificate issues can be challenging for Reverse Proxy users, regardless of experience. When dealing with these challenges, it’s crucial to review certificate installation, confirm the correct certificate chain setup, and check certificate expiration dates.
Addressing Application-Specific Challenges
Occasionally, challenges with Reverse Proxy are specific to the applications you use. In such instances, a thorough examination of application settings, confirming compatibility with Reverse Proxy, and checking for any known issues or solutions provided by the application’s developers can guide you through the troubleshooting process.
Conclusion
By following the instructions and guidelines outlined in this article, you should now have a strong foundation for using reverse proxy on your Synology NAS. Remember, reverse proxy enhances security, improves performance, and allows for seamless access to web applications.
As you continue to explore and utilize reverse proxy, don’t hesitate to consult the official Synology documentation and community forums for further assistance and advanced configurations. With reverse proxy on Synology NAS, you can elevate your web application delivery to new heights.